As you've seen or read in my first post on the guitar, chord playing was doable but that was also its limitation.
There were some issues with the SS10 out-of the-box. The biggest problem I found was that most of the frets had several shallow notches where the strings scrape over making string bending undesirable. So I made a decision to tinker with it at some point... and that was when it was time to replace the strings.
I do not own any luthier tools. Fixing it on my own with whatever tools I had was a conscious decision on my part, since it was a way cheap guitar, I wasn't worried if I turned it into firewood. It's more about the experience... of possibly ruining a low budget musical instrument.
GETTING HANDS DIRTYThere were some issues with the SS10 out-of the-box. The biggest problem I found was that most of the frets had several shallow notches where the strings scrape over making string bending undesirable. So I made a decision to tinker with it at some point... and that was when it was time to replace the strings.
I do not own any luthier tools. Fixing it on my own with whatever tools I had was a conscious decision on my part, since it was a way cheap guitar, I wasn't worried if I turned it into firewood. It's more about the experience... of possibly ruining a low budget musical instrument.
Issue One - High Action. The nut seemed to be glued on. I searched online for instructions on the proper way to remove the nut and the best way required too much work and tools that I didn't have. So on to plan B... file the grooves to lower the strings at the nut. Ideally, this required a nut file, which I didn't have and I surely didn't want to buy one. I ended up using the old E, A and D wound strings and lots of elbow grease. Worked just fine for the plastic nut.
I slowly filed at a slight angle (there are instructions online on how to go about it... just google it) to make sure that the strings wouldn't catch. It was a tedious process since I had to put the new strings back on and play with it for a bit to get a feel for the action and repeated the process until I was satisfied.
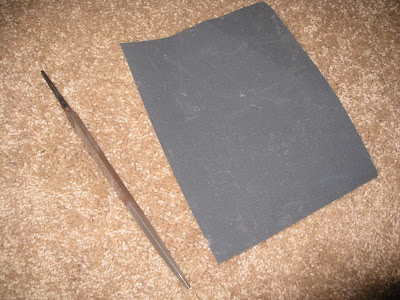
Issue Two - String Buzz and Rough Frets. Now that the strings were at a nice height at the nut, the next problem to deal with was string buzz and rough frets. The rough frets were easy to spot but locating the fret buzz was once again a tedious process since I had to test for buzz on every fret of every string. Ideally, for fret jobs you need fret tools. Fret tools, I found out, were expensive and since I don't do fretwork for a living, it did not justify the cost of buying them so digging into my toolbox, I found these...
GASP!!! Luckily, I'm going to use this file and sandpaper on a cheap-o guitar!
This is how some of the rough frets looked like... even filed down, you can still see the grooves. Try bending a string over them and you're in for a "nails-on-a-chalkboard" sound fest.
Whoever had this guitar before me probably tried to fix the buzzing as well and returned it to the seller when he (or she) made things worse.
Anyway, I went over the trouble spots, filed and sanded until the buzz went away. I knew it wouldn't look pretty compared to something done with the right tools but it did fix the problem.
Even after filing down the rough spots, there were still ridges left. Filing any further would render the fret useless. This required even finer sanding so I used a jeweler's wax which contained some micro abrasive material and applied it with a dremel rotary tool with polishing tip. The wax would sand and shine and smoothen the frets at the same time.Great stuff.
I removed the strings and wrapped the fretboard with blue painter's tape leaving the frets exposed and started the polishing/fine sanding/finishing process.
And after the careful polishing/fine sanding/finishing, I finally got really nice, shiny and smooth frets, I could barely notice the imperfections and irregularities... AND the strings didn't scrape anymore!
STYLE POINTS
RESULTS
Overall I was happy with the results. The guitar still stays in tune even after huge note bends, it had improved sustain, easier on the fingers and improved playability. Not bad for several hours of work and available basic tools.
I'm probably going to do a demo video so you can see and hear the results. Stay tuned.
FUTURE MOD
I purchased a Warman humbucker a while back which I can use to convert this into a SSH guitar but I'm still undecided about the wiring configuration. I will surely document that modding adventure when I get to it.
Thanks for reading!
I purchased a Warman humbucker a while back which I can use to convert this into a SSH guitar but I'm still undecided about the wiring configuration. I will surely document that modding adventure when I get to it.
Thanks for reading!


No comments:
Post a Comment
All comments are subject to review. Inappropriate or offensive comments will be denied automatically.